Showing posts with label mounting instructions. Show all posts

Saturday, January 30, 2010

Setting Up the 3Pi Classroom Kit - Part 2

Now that your mount with wiimote attached is securely attached to your data projector, it is time to connect the rest of the hardware.

Take the remote synch switch and put its red end plug into the matching red wiring socket.
You can then position the remote switch in a convenient location - you have 10m of cable so this should be easy.

Now plug the power adapter into its matching black socket. (Note: unless a customer species otherwise, the power adapter supplied will have the standard New Zealand/Australian pins. It will work on almost any international power system but you would need to source an adapter plug to fit your wall outlet. Let us know if you would like a different configuration.)

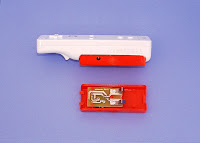
It is worth mentioning that our red power insert, that clips in where the wiimote batteries used to, has been designed and built specifically for the wiimote. It is not a rebranded rechargeable battery pack in disguise. It can handle a wide range of voltages and then puts out a steady wiimote friendly voltage and current.
Monday, January 18, 2010

Setting up the 3Pi Classroom Kit - Part 1

If you have purchased one of our kits you have everything you need to create a reliable wiimote based interactive whiteboard. We include setup instructions on both a CD and in written form. Firstly, we will discuss attaching the 3Pi bracket to your ceiling mounted data projector.
In the kit you will find two plastic clips that look like this.
There is a single screw that attaches each clip to the data projector mount. All you have to do is find two convenient holes somewhere near the two front corners of the mount and do the screws up. We usally manage to fit these with no tools as we supply them with easy to use wingnuts (as shown in the picture above).

When the two clips are attached, press the 3Pi mount tube into them so that it is parallel with the front of the projector mount. The tube will now be held securely in place.

You then simply screw the wiimote to the swivel at the end of the mount (our 3Pi power insert has a moulded in thread for this purpose) and plug the power cable into the wiimote.

This should all take you less than 5 minutes.